
Assembly management with Odoo
In this article I would like to show you how you can use Odoo to manage circuit boards.
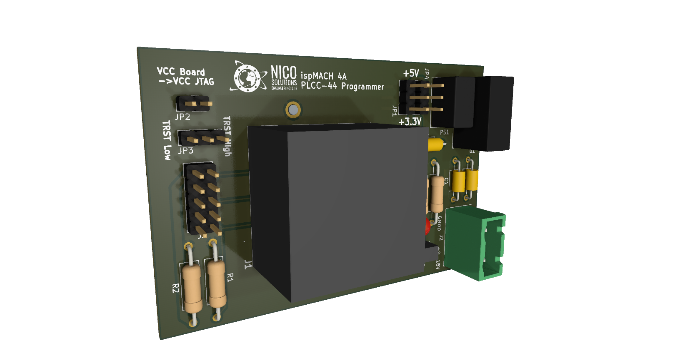
A programming adapter for a CPLD series in the PLCC-44 housing serves as
a small demonstration object. This example can be transferred to any
other product types.
The primary aim of this article is to present the management of manufacturing products in Odoo, using the Manufacturing, Purchasing & Warehousing modules. Taking into account Odoo version 17, which will be available soon, we will devote this article to this version (development status V16.4 from October 18, 2023) in order to gain a deeper insight.
You can find a brief, more general insight into Odoo 17 here...
Preparation
Yes, that's right, a little preparation is necessary. Odoo STILL can't develop circuit boards...
In order to be able to map the processes involved in production and thus also purchasing and warehousing in Odoo, all necessary product-specific documents are required first.
Since we want to concentrate on the tasks that arise in Odoo, the
technical aspects of the circuit board will only be briefly discussed
and only touched on for the purpose of transferring it to Odoo.
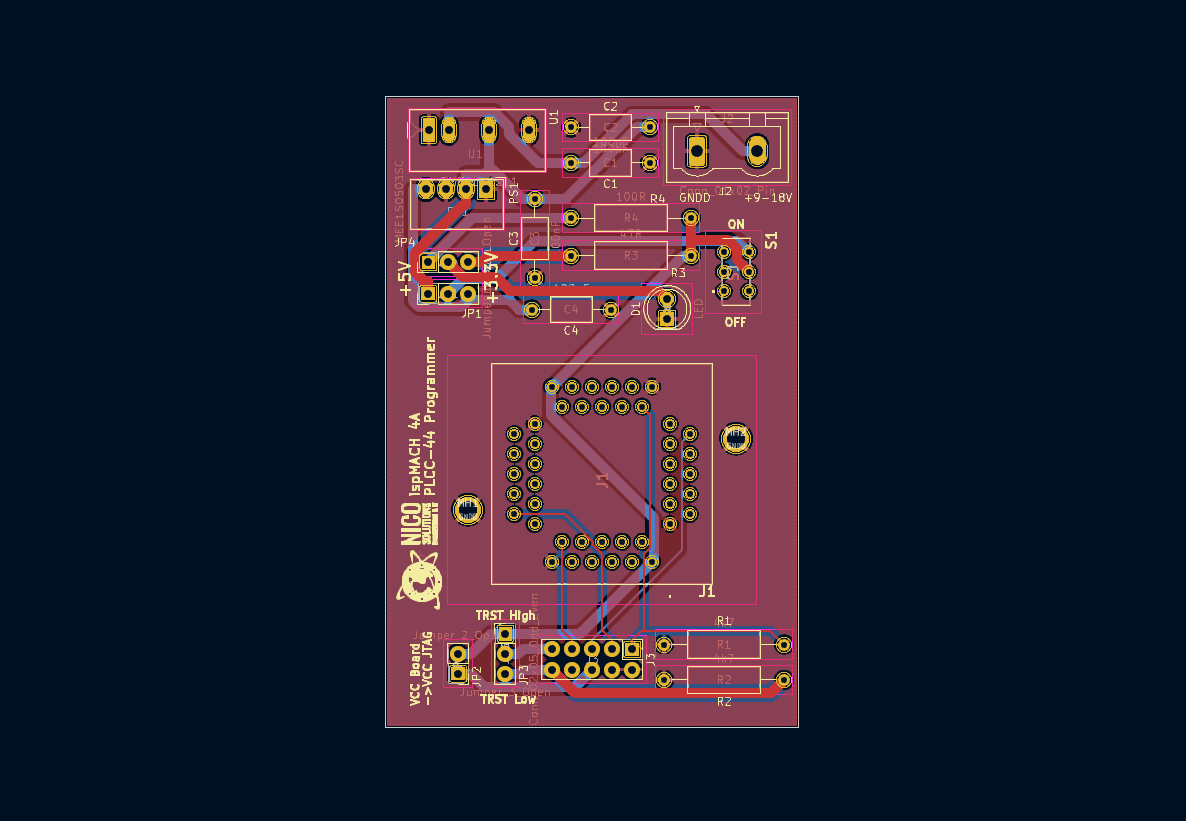
Create circuit diagram, PCB layout & manufacturing data
As mentioned, the technical documents of the development product form
the basis for the display in Odoo. For printed circuit boards, these
primarily consist of the circuit diagram and the PCB layout.
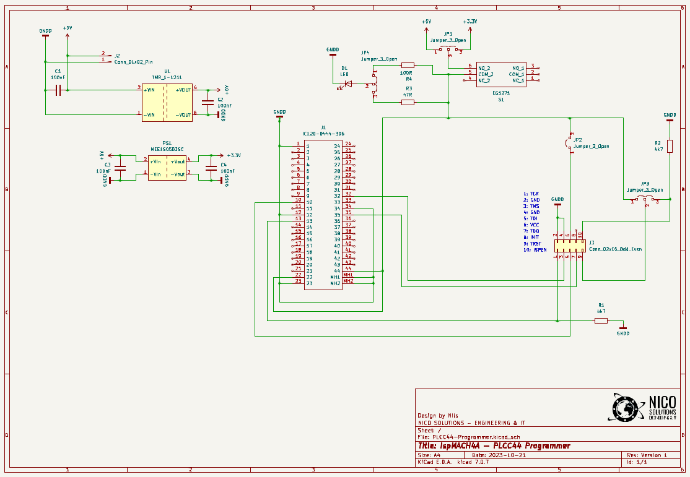
Once these have been developed and created, the next step is to generate the manufacturing data for the circuit board. In circuit board production, this is particularly the so-called Gerber and drilling data.
The Gerber files contain the information of each individual PCB layer such as top layer, bottom layer, solder mask, etc. The drilling data contains all information about the holes required for vias and other elements.
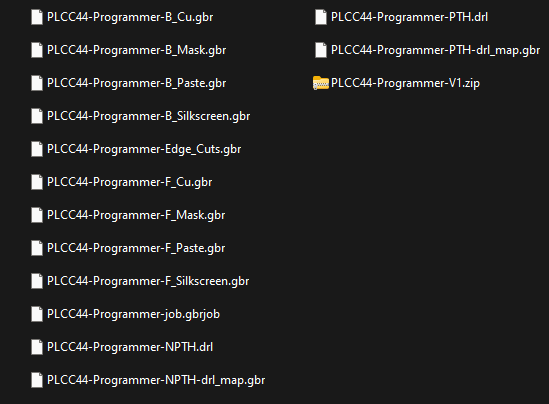
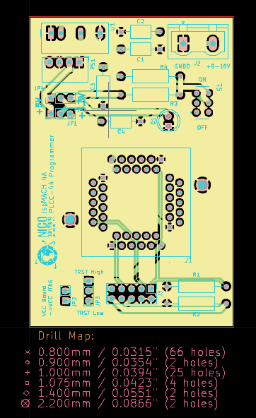
Now we create a ZIP archive with all the information mentioned. Modern
Gerber viewers are able to import and process a complete ZIP archive. We
add the extension V1 in the file name. More on this and the ZIP archive
later.
Speaking of Gerber Viewer...
The generated files should always be checked with a Gerber viewer before release to prevent unwanted effects.
And to all electronics experts...
Yes, the C's aren't necessarily the right ones, but that's not the point here
It also leaves room for the presentation of the PLM module. More on this in a later article.
What else do we need?
Right... The parts list is very important. The parts list is the basis for mapping production and the correct handling of automated procurement. Every modern schematic editor or PCB layout program is able to generate a parts list (also called BoM = Bill of Materials), which we of course also use. A list in CSV format and you can go on. Somewhat reworked and based on the products created/to be created in Odoo, the list should look something like this.
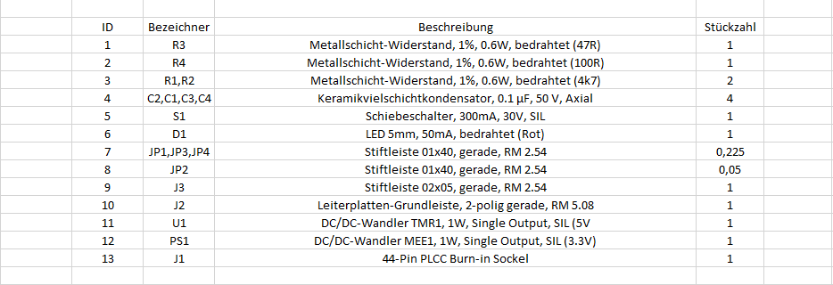
Don´t forget. These parts lists contain all components to be assembled on the board. But not the circuit board itself!
FYI: I have learned for myself to name the unpopulated circuit board
"Leiterplatte". I describe the assembled state with the term "Platine".
This helps me personally a lot with handling within Odoo.
Now we have gathered all the essential information and can finally devote ourselves to Odoo.
Create product "Leiterplatte"
So let's start by defining our product "PLCC-44 Programmer - Leiterplatte". As mentioned above, I use the term "Leiterplatte" for the unpopulated state.
We switch to the Sales, Warehouse, Purchasing module (...or you choose your preferred route) and open the product view. There we create the product “PLCC-44 Programmer - Leiterplatte” by clicking on “New”.
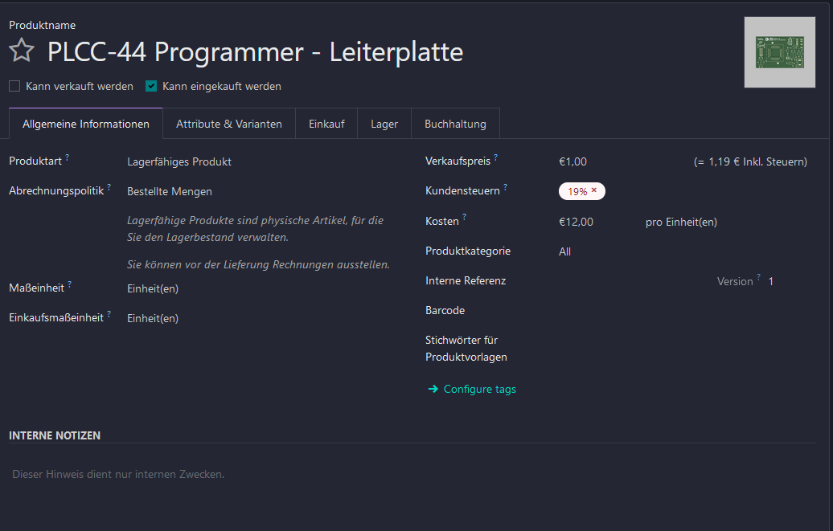
What do we have to pay attention to now? First of all, it is important that we define the product as storable due to storage requirements. To do this, we select “Storable product” under product type and thus activate the warehouse management.
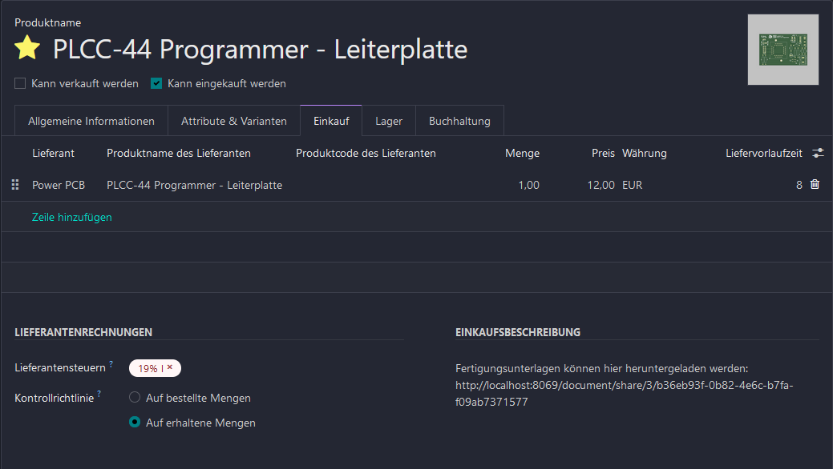
To complete the basis of automatic procurement, a supplier MUST be defined in the Purchasing tab. There we select our supplier and can store information such as the price, the supplier's product name, or a purchase description, etc.
The purchase description can be very useful if, for example, you want to
release the production documents for the supplier using the Documents
module and share the link directly in the request for quotation or
order. There are other ways to achieve this in Odoo, but it is an option.
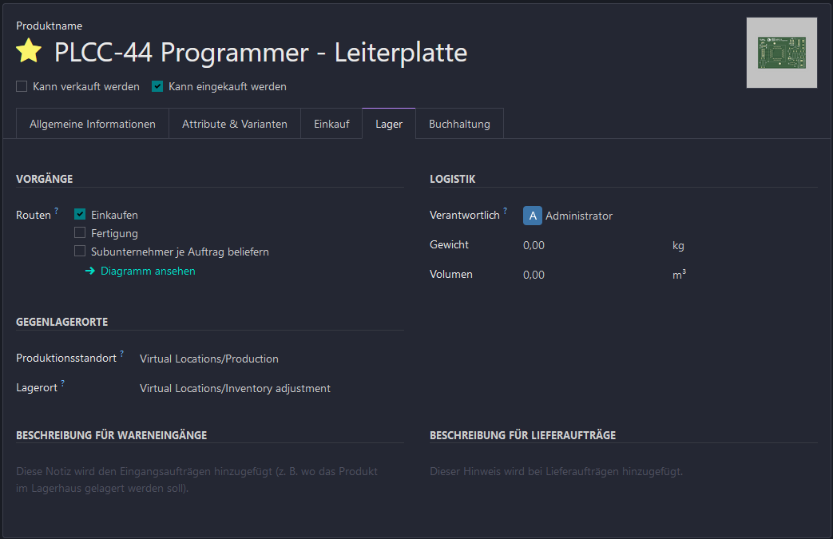
The route in the Inventory tab. Since we do not manufacture the circuit board ourselves and purchase it from a supplier, the “Buy” route is selected.
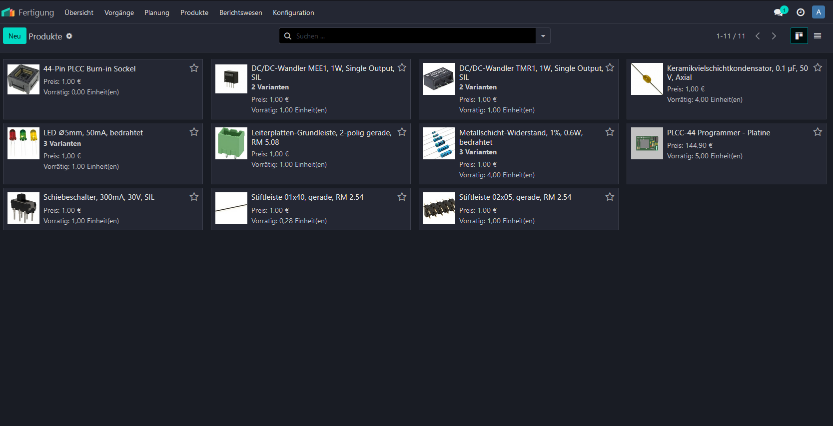
Create BOM items
Now let's move on to the components to be assembled. As shown in the
circuit board example, the parts list items (if not already available)
are now created in Odoo or, if necessary, imported directly.
I'll just take for granted how to create or import products. If you have any questions about this... Get in touch.
Important here... These items are purchased from a supplier. Here too, a supplier is defined in the Purchasing tab and the route in the warehouse is set to “Buy”.
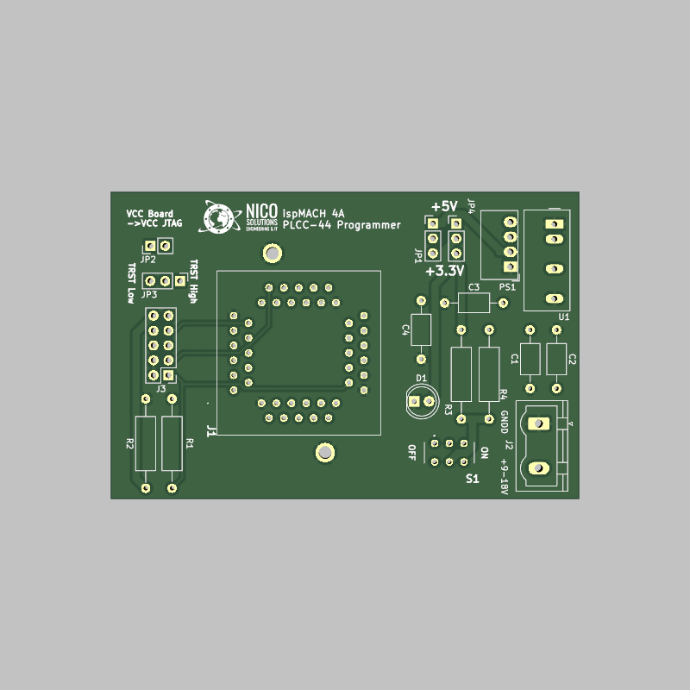
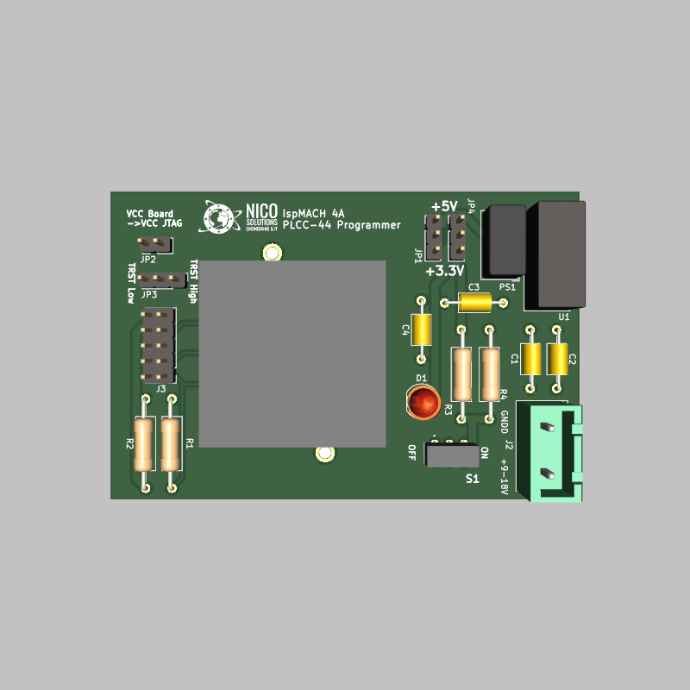
Now we should be ready to devote ourselves to the assembly. Below is a small overview of our previous products.
Create product "Platine" & BoM
It is now time to create the product “PLCC-44 Programmer Platine”.
The main difference to the products created so far is the route in the
Inentory tab. We do not want to purchase this product from a supplier,
but rather we would like to manufacture it ourselves. So let's set the
route here to "Manufacture". The fact that this product must also be
defined as a “storable product” is self-explanatory - at the latest with
regard to the delivery order for the customer.
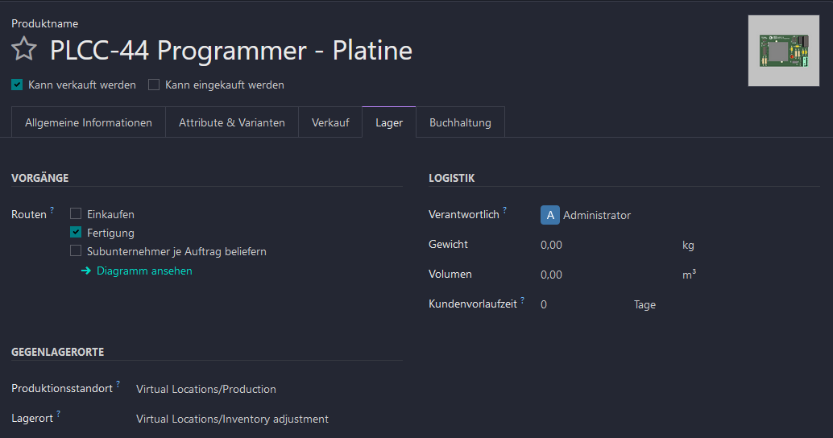
For production, knowledge about the assembly structure and therefore which components make up this product is essential. So we have to define or transfer the parts list/BoM. To do so, we click in the smart button area...
Correct: Bill of Materials.
In the view that opens, we click on “New” and the input mask for the parts opens.
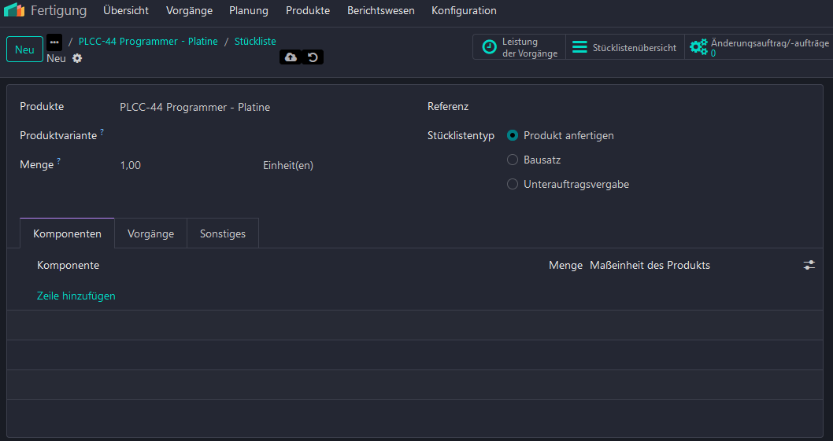
If the BoM should apply to a specific variant, this can be selected under "Product variant". Personally, I prefer to create a global BoM for the product that is superior to its variants.
In detail, this means that a BoM is created without specifying the
variant in the field mentioned. If there are variants and certain BOM
items are only required for certain variants, these variants can be
filtered accordingly when adding the products to the list. This means
that only one BoM is kept for each product with corresponding variants
and the clarity can be significantly improved. If you don't see the
field for the "Apply on variants" selection... In the Components tab,
these can be shown or hidden using the controller symbol on the far
right. There are certainly limits to this approach. In the case of very
long BoMs with many variants, one BoM per variant can also offer
advantages. Which path you ultimately take should be considered
individually in advance.
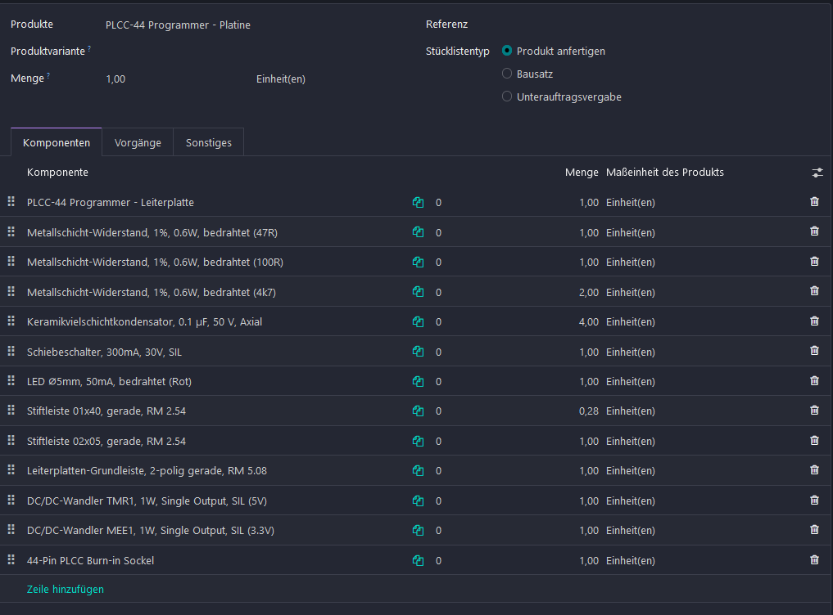
By clicking on "Add a line", we add the products to be assembled on the board and of course don't forget to also add the product "PLCC-44 Programmer - Platine".
Specifying the required quantity of assembly components is of
corresponding importance for procurement. So please don’t forget to
define these accordingly.
For BoM type, we select “Manufacture this product”. This means that, for
example, when the item is sold and the order is confirmed, a
manufacturing order is created directly. Depending on the configuration,
of course only if it is not in stock.
Personally, I always sort the products in the order in which they should be populated on the circuit board. I also proceed the same way with mechanical or other assemblies. Sorting the parts list accordingly may seem superfluous at first glance and also takes a little more time. But believe me... It's not just the manufacturing workforce that will thank you!
Our BoM should now look like this:
Basically we now have everything together to look at the workflow in Odoo. But since we are so nice, we will help our colleagues in manufacturing a little.
Define processes
In order to pass on the corresponding instructions to the manufacturing, we switch to the “Operations” tab within the BoM view.
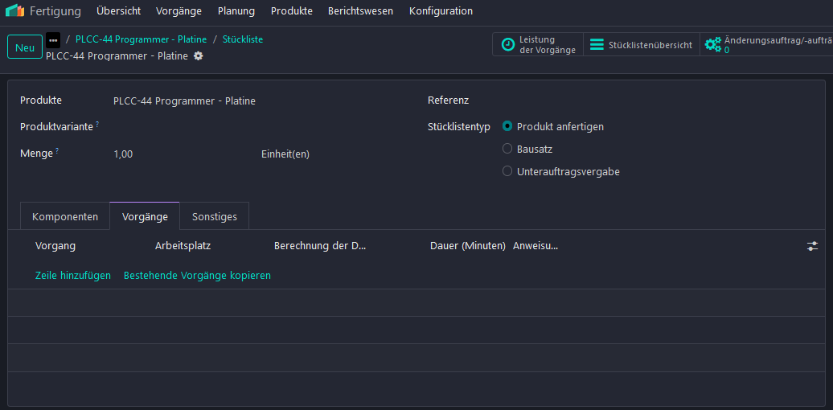
Click on Add a line and the view for defining the operation process opens.
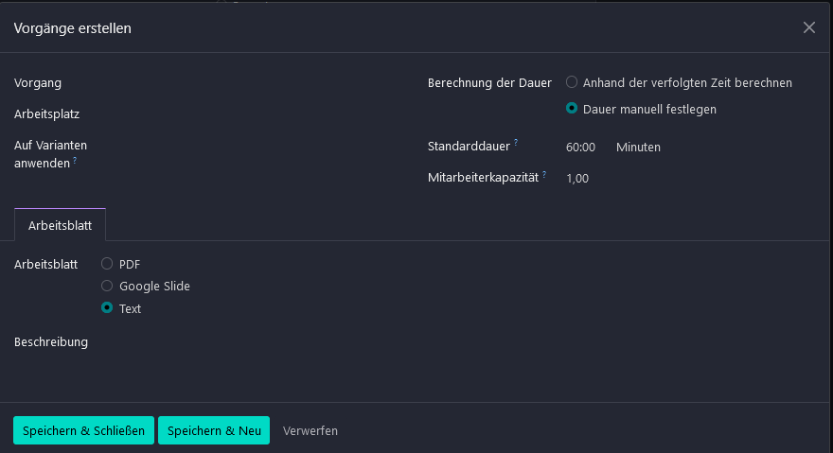
First, we define a name or label to the opereation. In our example: “Bauteile einlöten" (which means: "Solder in components”). We then choose a suitable work center. If this operation only applies to certain variants, we can select them in the "Apply on variants" field. The duration and number of employees required will also be determined.
If you have questions about work centers, operation duration, employee capacity and their effects... I'm thinking of writing a separate article for that. So be patient... Alternatively, you can simply contact me
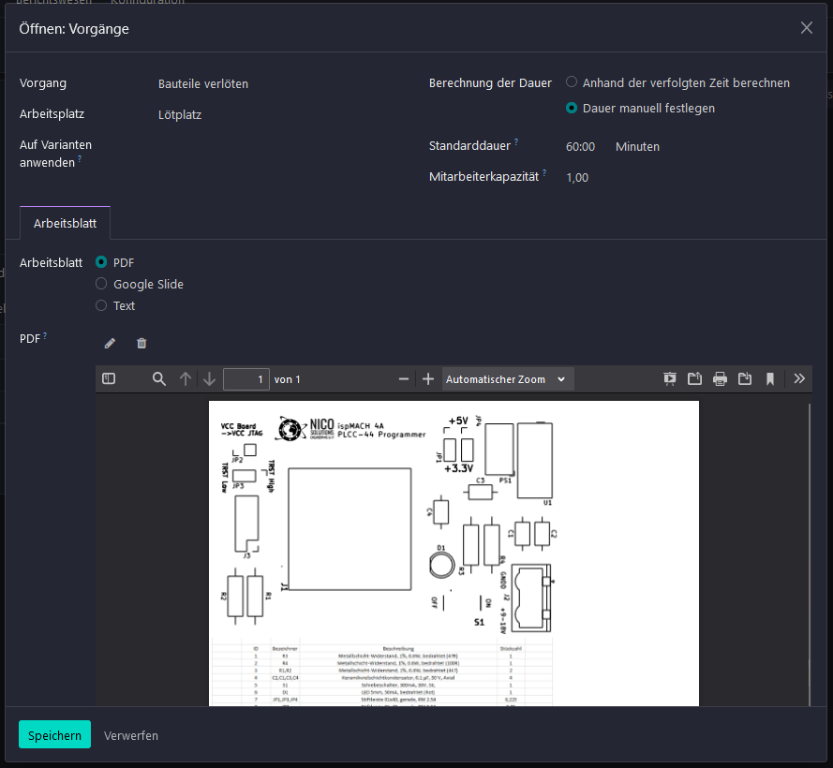
We'll now keep our nice nature in check and limit our help in providing a PDF. Graphics simply say more than a thousand words. What is displayed... A printout of the top silk screen, as well as our parts list from the PCB layout program. This makes it much easier to assign components and positions.
No problem. You're welcome
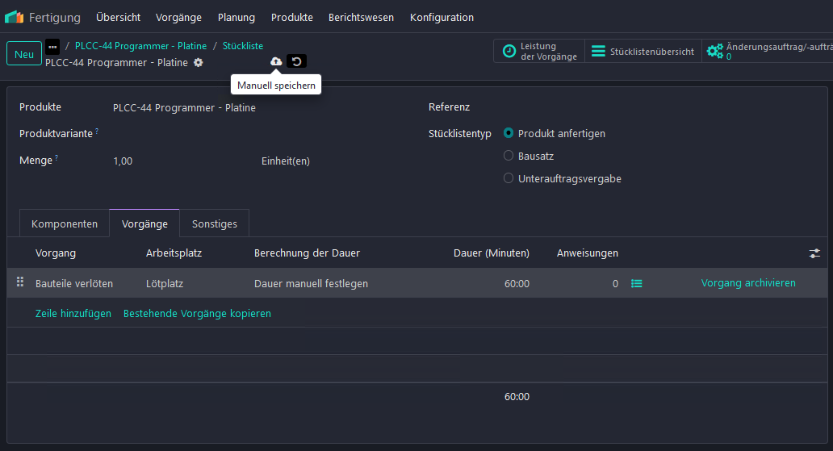
We now save this state. Back in the parts list view, the process appears in the list and we save the whole record again here.
Workflow
Everything else is the usual Odoo magic. Let's take a look at the workflow.
To do this, we switch to the sales module, create an offer for our circuit board and confirm the order.
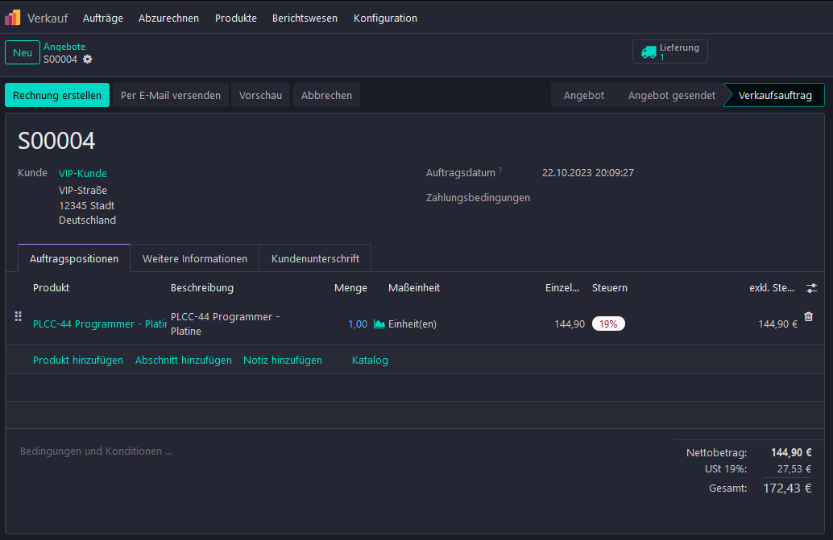
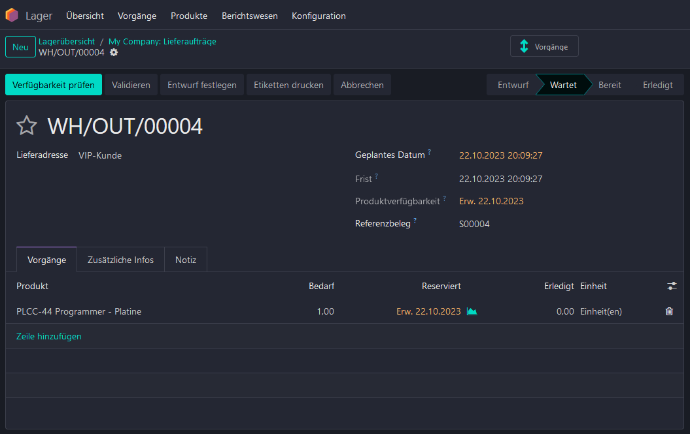
When the order is confirmed, a delivery order to the customer as well as a manufacturing order for the circuit board is generated and confirmed in Odoo. Here, it should be noted, the manufacturing order was created because there was no assembled board in stock.
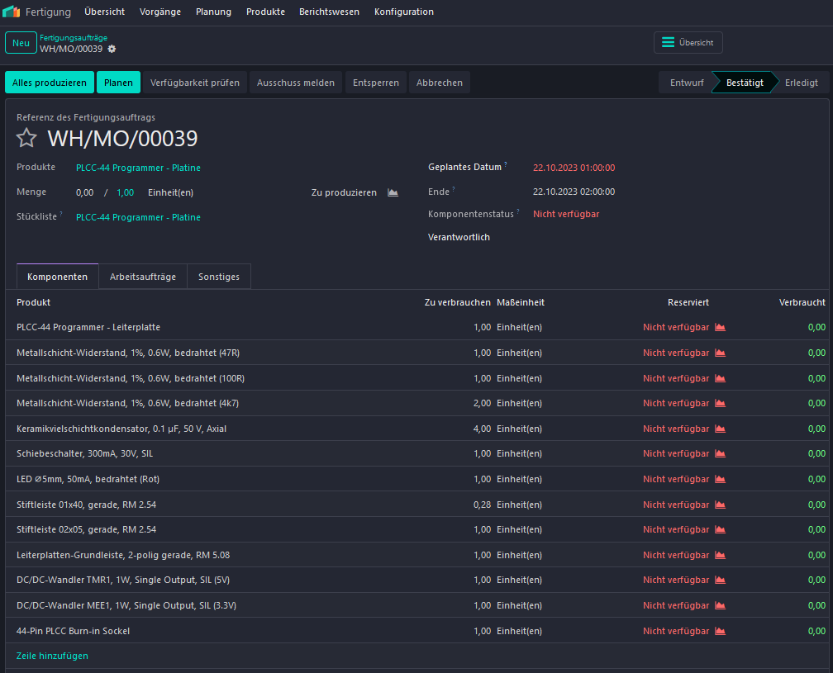
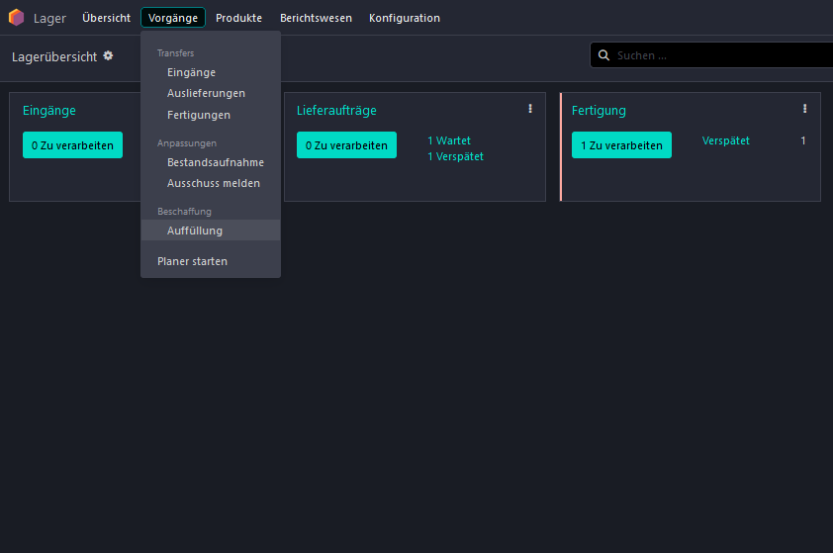
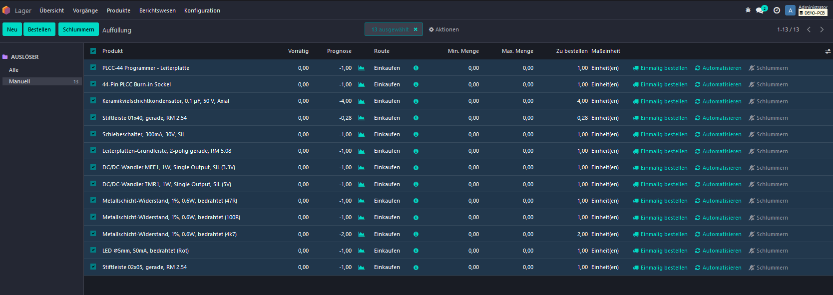
In the manufacturing order we can see directly that all of the components for the board are not in stock. No problem. We could now wait until the procurement planner starts automatically, which reserves inventory for operations awaiting availability and triggers the reorder rules. But since we are very impatient people at the moment and a little manual work doesn't hurt us, we switch to the Inventory module. There we navigate to 'Operations' and select 'Replenishment' under Procurement.
Et voilà... All required parts will be listed for u.
We now select all data records, click on “Order” and then switch to the Purchasing module. What awaits us there?

Two draft RFQs. That's easy!
On the one hand, we have the RFQ with the item “PLCC-44 Programmer - Leiterplatte” including a link to the production documents. And on the other hand, another RFQ for all electronic components on the board. Each addressed to our trusted supplier.

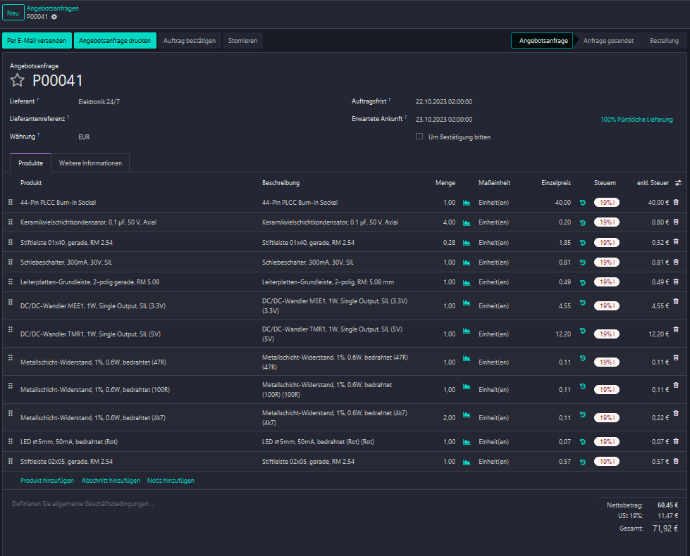
How to create and process a purchase order from RFQ is not explained further here. If you have any questions about this, please get in touch. In short... If necessary, obtain prices via the RFQ, transform it to a sales order by confirming the RFQ and send it tp the supplier. The confirmation in turn creates delivery receipt orders for the ordered goods.

When goods are received, these incoming delervy orders are validated and
the inventory is updated. How about our manufacturning order now?
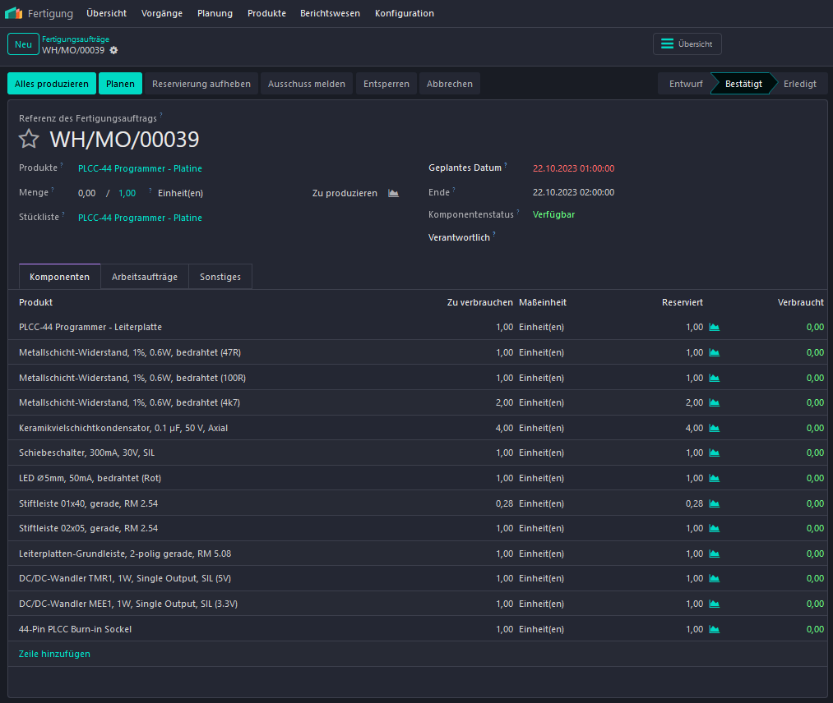
All parts are available. Thanks to the purchase department!
And... wait. What is that? Colleagues in manufacturing also have the opportunity to use the shop floor view in this version.
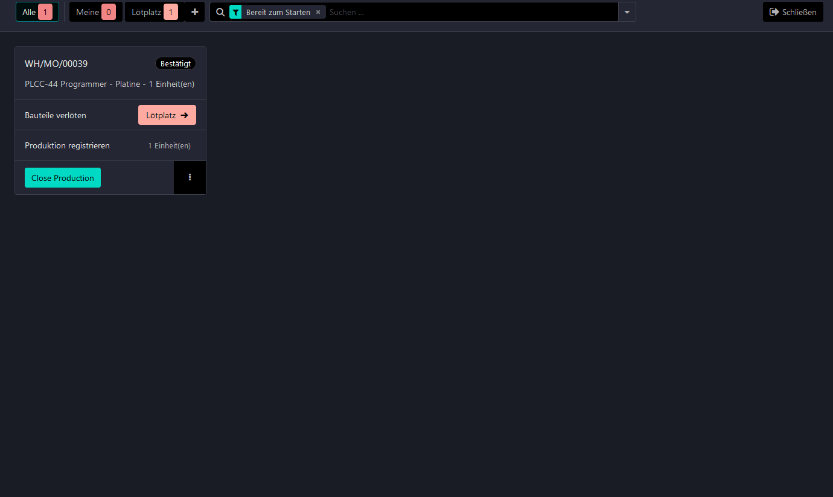
Then let’s check in directly at the soldering work center.
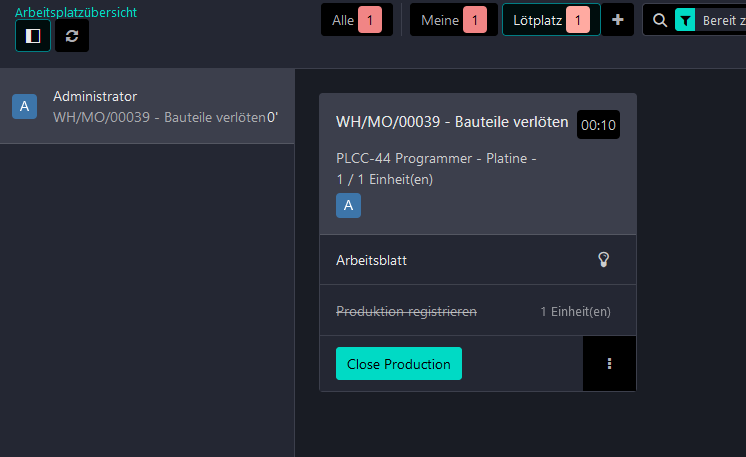
Clicking on the name of the manufacturing order starts the timer. Now let's look at the worksheet by clicking on the light bulb icon.
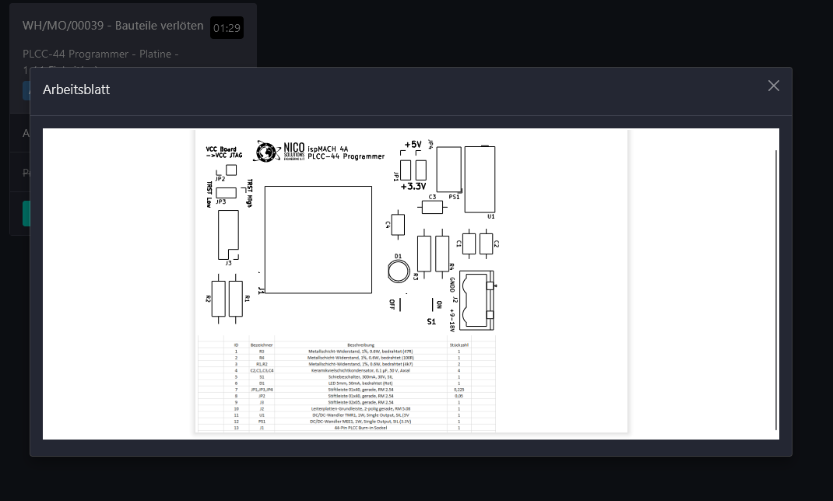
An overview of the Top Silkscreen and the parts list for assigning the position of the components. Well if that isn't helpful?!
After completing the work, we close the worksheet and confirm completion
with “Close Production”. This means that in the present setup the
populated board is stored directly. Let's take a look at the delivery
order for our customer.

The goods are ready for shipping. Finally, in brief... Validate delivery, the customer is happy and we can issue the invoice
As you can see, Odoo is very powerful when it comes to mapping manufacturing and the associated processes. But Odoo is not only convincing in manufacturing, inventory and purchasing. This article only covers a basic example configuration. Odoo scores with strong arguments on many levels and can be adapted to almost any area. And all of this is fully integrated in one system.
Would you like to find out more about how you can integrate manufacturing documents into the pruchasing process with Odoo Documents? What was this ZIP file for again and where do I put it? Does the file name extension V1 have to do with the PLM module and if so, how do I document, for example, adjustments to the capacitors and manage the revisions?
Perhaps you are interested in how work operations can be made even more
detailed and how quality checks can be integrated? Or would you like to
know how to plan production with Odoo?
You are welcome to contact me if you have any of the above or other questions. I will address these as best I can.
Odoo is ready for you. Are you ready for Odoo?
You can find out more about my Odoo offerings here